
Are you are working on windows 8 and you have got stucked in making a wireless network to share internet or any document you want? In this post I am going to tell you how to setup a wireless network in windows 8 in your system. If you want the freedom to work anywhere in your house, you need a wireless network. Wireless internet has become the standard and over the past two decades has proved to be indispensable in the world of wireless internet sharing. What a wireless network does is provide data and internet sharing within the range of the router. In windows previous versions like vista, Window 7 it was pretty much easier to set up a wireless network by simple hitting some icons and giving some essential detail but in the latest version i.e. window 8 the task is comparatively tough. So you need a step by step tutorial to make a wireless network. There are few things you need to know to set up the wireless network so that you share stuffs with other computers. You need to have following two conditions satisfied to do this task-
1--> First, you must have a wireless network adapter. Almost every computer nowadays have this component.
2--> Second you need a wireless router. Yes, this thing connects to your broadband modem.
Once you have the above two conditions satisfied, you are ready to set up a wireless network in your windows 8 operating system. Here are sequences of steps you need to follow in order toset up a wireless network.
1--> Connect your network cable from the port to the internet port in your laptop/PC. This internet port looks something like this-
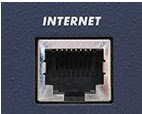
It is generally on the back of many laptops but may be on the left or right side of your laptop.
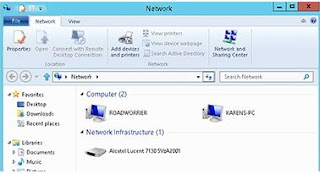
2--> Once the network cable is connected to your system, switch to the start screen and hit File Explorer.
->Click Network, now you would see a window like below-
3--> Now, double click the router icon.
4--> Enter username and password.
5--> Click OK
6--> In the next step you have to tell the window about various things like "the type of internet
connection", "the network name","The wireless security options" and the admin password and that’s it. You are done. You just created a wireless network for windows 8. Cheers!!!
CONNECTING TO THE WIRELESS CONNECTION
1--> Hit Windows + I to open setting window.
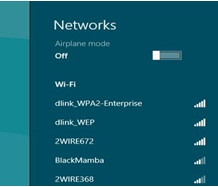
2--> Click the wireless network icon.
3--> Click the wireless network. Click the network you've created earlier.
4--> Click connect.

5--> Enter the password you have set when you created the network.
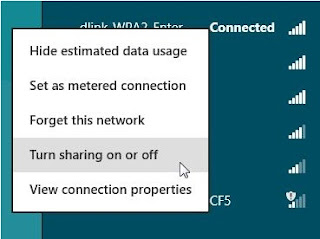
6--> Click "turn on file sharing and" and connect to devices.

And hurrah!!! You just created a wireless network in windows 8. So that was a quick guide to help you all to set up the wireless network.
1--> First, you must have a wireless network adapter. Almost every computer nowadays have this component.
2--> Second you need a wireless router. Yes, this thing connects to your broadband modem.
Once you have the above two conditions satisfied, you are ready to set up a wireless network in your windows 8 operating system. Here are sequences of steps you need to follow in order toset up a wireless network.
1--> Connect your network cable from the port to the internet port in your laptop/PC. This internet port looks something like this-
Internet Port
It is generally on the back of many laptops but may be on the left or right side of your laptop.
2--> Once the network cable is connected to your system, switch to the start screen and hit File Explorer.
->Click Network, now you would see a window like below-
Network Window
3--> Now, double click the router icon.
4--> Enter username and password.
5--> Click OK
6--> In the next step you have to tell the window about various things like "the type of internet
connection", "the network name","The wireless security options" and the admin password and that’s it. You are done. You just created a wireless network for windows 8. Cheers!!!
CONNECTING TO THE WIRELESS CONNECTION
1--> Hit Windows + I to open setting window.
2--> Click the wireless network icon.
3--> Click the wireless network. Click the network you've created earlier.
Network
4--> Click connect.
Network Connect
5--> Enter the password you have set when you created the network.
Network
6--> Click "turn on file sharing and" and connect to devices.
File Sharing
And hurrah!!! You just created a wireless network in windows 8. So that was a quick guide to help you all to set up the wireless network.
.jpg)
